In this lesson, we’ll learn how to set up parameters and place Columns in Archicad.
To begin, open the floor plan view and display the Grid layer for easier setup and modeling of Columns. You can also place Columns in other views, such as 3D view, but the most convenient and accurate method is to work directly in the floor plan.
| See: Lesson 4 – Getting Started With the Archicad Interface
Column Settings
To access the column parameters, select the Column Tool from the Toolbox and press Ctrl + T to open the Column Settings dialog.
| See: Lesson 5 – Basic Archicad shortcuts

Core Width/Height
This controls the cross-section size of the column:
For rectangular columns, enter the width and length values here.
Tip: Click the chain icon if you want both dimensions to be equal.
For circular columns, the field will display the diameter instead.

Column Height
This defines the column height:
If the Top and Bottom of the column are not linked to any story level, you can directly enter the height here.
If the column is linked to story levels, this field will be grayed out and automatically controlled by the floor height and the settings in the Positioning Panel.
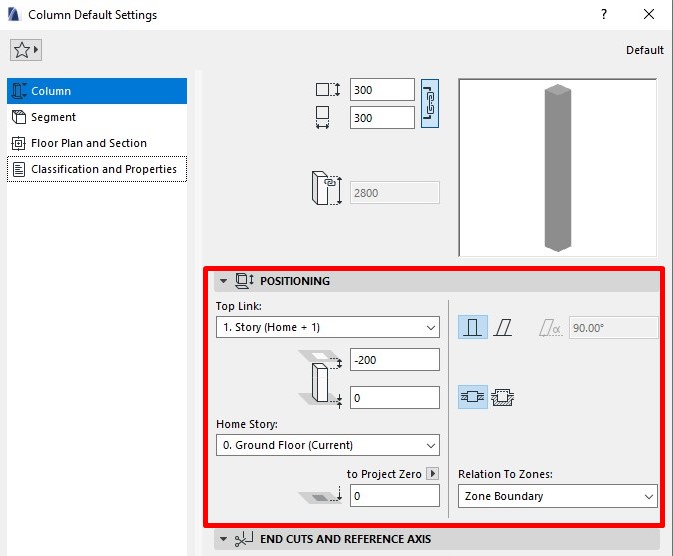
Column Positioning Panel

By default, a column is linked to the current story (Home Story) and the story above it.
You can change the Home Story and Top Link to other levels and define the offset distance between the column and the story level.
When you adjust these offsets, the column height value will update automatically.
Alternatively, you can set it to Not Linked and manually enter a fixed height in the Column Height field.
Place Columns
Before placing a column, make sure you’ve adjusted the size, height, and positioning in the settings.
You can place a column using four different input methods available in the Info Box:

Simple Column

Best for most standard vertical or slanted columns.
Place the column with a single click on the floor plan.
Two-Click Column Input (Nhập bằng 2 Click)
Allows you to freely define the slant of the column while placing it.

First click: set the column base point.
Second click: complete the placement and define the slant angle (and height if working in 3D view).
Note:
In floor plan view, the second click only sets the slant angle (height is fixed).
In 3D view, both the slant angle and height can be defined relative to other model elements.

Rotated Column

First click: place the column.
Second click: define the rotation angle of the column.
Slanted and Rotated

Specifically for slanted columns.
First click: place the column.
Second click: set the rotation angle.
Third click: adjust the slant axis and finish the command.