Next in the Archicad basic tutorial series, I will guide you through creating section and elevation views of the building.
CREATE SECTION VIEWS
Select the Section Tool
1. Select the Section Tool
On the 1st Floor plan view, select the Section tool from the Toolbox.

2. Draw the section line
After selecting the Section tool, draw a straight line just above grid B by:
Click to select the start point > Click to select the end point (similar to drawing a line)

After drawing the section line, an eye icon will appear to select the viewing direction of the section.
Left-click toward the desired viewing direction.

Select the viewing direction of the section
3. Open the section view
After placing the section, the newly created section view will appear in the Sections folder of the Pop-up Navigator.

Double-click the view to open the section view.

Alternatively, you can:
Right-click on the Section marker in the floor plan
Select Open with Current View Settings to open the section view

Select Open with Current View Settings to open the section view
4. Basic settings of the Section tool
Double-click the Section icon in the Toolbox to open Section Settings.

General
Reference ID: Enter the section ID and name in these two fields
Horizontal Range: Controls the horizontal depth of the section view
Infinite: No limit
Limited: Limit the viewing range
Zero Depth: No depth (only the cut line is visible)
Vertical Range: Controls the vertical height of the section view
Infinite: No limit
Limited: Limit the viewing range (adjust in the adjacent column)
Story Levels
This section controls the display of story levels in the section view.

Show Story Levels
There are three options:None: Do not display story levels
Display Only: Display story levels in the view only, not in the layout
Display & Output: Display story levels in both the view and the layout
Marker & Story Level Lines
Settings for story level line types and story name display
(There are three checkboxes corresponding to the left, center, and right positions)
Grid Tool
Settings for displaying grid lines in the section view.
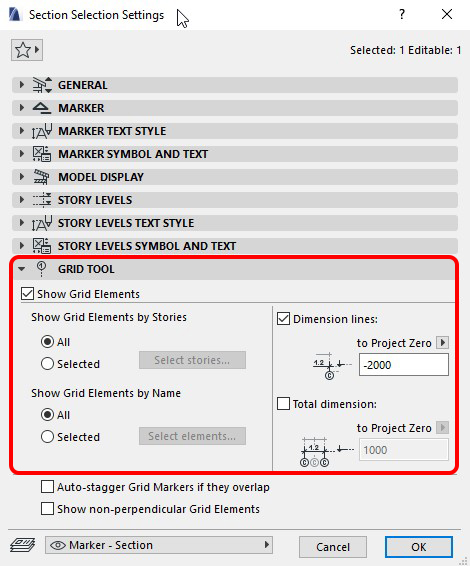
Show Grid Elements:
Check to display grid lines, or uncheck to hide themShow Grid Elements by Stories:
Display grid lines by storyShow Grid Elements by Name:
Display grid lines by grid nameDimension:
There are two Dimension settings on the right side.
These control automatic dimensioning in the section view.
When enabled, grid dimensions and overall dimensions will be displayed automatically.
CREATE ELEVATION VIEWS
For elevation views, select the Elevation tool from the Toolbox.

The settings for Elevation are almost identical to those of the Section tool, so you can configure them in the same way.
Note
Although Section and Elevation are two separate tools, their functions and settings are almost identical.
You can:
Use the Elevation tool to create sections
Or use the Section tool to create elevations
without any functional difference.
However, for better data organization and project management, it is recommended to use the correct tool for its intended purpose.